Table of Contents:
1 .Quick Decline offer Requests - Directly from the List View
2. Declining Offer Requests from Request Page
3. Showing or Hiding Columns in Requested/Ordered Parts table
4. Adjusting Column size in Requested/Ordered Parts Table
5. Assigning users to Requests and Orders - How do I see who is working on what?
6. Bulk Editing - How do I edit multiple lines at once?
7. Removing Parts from offer requests - How do I remove parts?
8. Adding Parts to Offer Requests- How do I add parts?
9. Setting Defaults - How do I set the same value for every request?
10. Part Level Notes & Images - How do I add notes and or images to a part?
14. Adding an invoice/order reference number to an order
1. Quick Decline offer Requests - Directly from the List View
Head to the orders page, click "Requests" and ensure it its highlighted. You will see a list of all your requests (New and All) below. For all new requests that are pending response you will see a "Decline" button on the right most column titles "Quick Decline". Click on the decline button to decline the offer request without opening the offer request page.
2. Declining Offer Requests from Request Page
Head to the requests page by clicking on the offer request. Scroll to the bottom on the page and find the the "Decline Request" button on the bottom right of the page besides the the Submit offer Button. Click the "Decline Offer" button and confirm to decline the offer.
3. Showing or Hiding Columns in Requested/Ordered Parts table
In the requests page, scroll down to the table of requested parts. On the right side just above the table, click on "Columns". This will open up a list from which you can select coloums to show or hide.
4. Adjusting Column size in Requested/Ordered Parts Table
In the requests page, scroll down to the table of requested parts. The width of the columns can be adjusted by clicking on the line between two columns and dragging to the left or right.
5. Assigning users to Requests and Orders - How do I see who is working on what?
In the top right hand corner of the request and as well as in the order, you will see an icon with your name initial on it. Click on this icon and the colour will turn from light blue to solid blue, indicating you are assigned to the request or order. This icon will now show in the summary page for you and your team to see. You can unassign or re-assign as many times as you like!

6. Bulk Editing - How do I edit multiple lines at once?
You can select all the parts in the request by selecting the top left-hand checkbox. You can also edit specific lines at the same time by selecting the check boxes in front of the parts that you wish to edit together.
7. Removing Parts from offer requests - How do I remove parts?
First, select the checkbox in front of the part you wish to remove. You can select multiple parts if you wish. Next, in the top right-hand corner of the parts list, you can select 'Remove'.
8. Adding Parts to Offer Requests- How do I add parts?
In the top right-hand corner of the parts list, select 'Add item'. Type in the description of the part and fill in the remaining information including quantity.
9. Setting Defaults - How do I set the same value for every request?
You can set default values for Grade, Lead time, Returns policy and Stock location. To set these values so they pre-fill in every request, in the column heading, click the down arrow. This will bring up a drop-down menu where you can set the default value. You will still be able to change the values within the request and you can change your defaults at any time.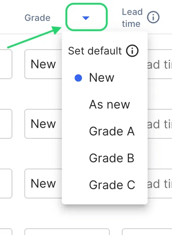
10. Part Level Notes & Images - How do I add notes and or images to a part?
Between the checkbox and the name of the part you want to add a note or image to, there is a grey down arrow. Click the down arrow, and it will open up a section below for you to add any notes or images to the part.
11. Offer Requests Sorting
On the requests page, use the tabs "New" and "All requests" to sort the offer requests. All requests that require action from you can be found under "New", so you can easily see incoming requests & requests that have had additions made to them.

12. Orders Sorting
On the orders page, use the tabs "New", "Upcoming", "Cancelled" and "All" to sort your orders. "New" displays all new orders,“Upcoming” displays orders with delivery dates from 3 days ago through 7 days ahead, so you can check what should have been sent and what is up next for delivery, "Cancelled" displays all orders that were cancelled and "All" displays every order.

13. Marking Returns
1. Navigate to the order you need to return parts for in the Orders page.
2. Select the parts that need to be returned by clicking the checkbox in front of the part/s.
3. Click 'Mark items as returned' in the top right-hand corner.
4. Select the correct return reason and add a note to help with the validation process. Then you can click 'Mark as returned'.
Note: You cannot undo this action.
5. Now you can see the parts marked as returned and our team will work to validate the credit.
14. Adding an invoice/order reference number to an order
1. Once an order is confirmed, Click into the order and find order reference in the 'Details' section.
2. Click the pencil icon, enter your invoice/order reference number and then click save.
3. Now you should see your invoice/order reference number visible in the 'Details section'. This number can be edited at any time.
As always, please don’t hesitate to reach out with feedback, issues, or just to say hello.
Many thanks,
Team Partly!!